Shaving soap lather is four moves: wet the brush the way its hair needs, load more soap than feels reasonable, add water a few drops at a time until the lather turns glossy, then work it in with the brush instead of painting it on. Most thin, airy lather that disappears mid-shave comes from the same mistake: too little soap in the brush, then water added to compensate.
This page is for you if you have a puck or tub of shaving soap and the lather it produces is not doing its job. Skip it if you shave with an electric razor, which needs no lather, or if you use canned foam and are happy with it. And if you would rather not build lather at all, the shaving cream guides cover the tubed options; that is a legitimate choice rather than a compromise.
What a usable lather looks like
You are aiming for something closer to thick yogurt than to foam: dense, slightly glossy, and holding soft peaks where the brush pulled away. Two independent guides land on the same description from different directions. Sharpologist calls it a shiny, somewhat loose consistency with soft peaks, like cake batter, and no visible bubbles, while soap maker Barrister and Mann describe a dense, yogurt-like texture and are blunt about the alternative: the more air you whip in, the less slick the lather becomes.
That gives you two readings you can trust at the sink. If the lather slides off the brush in a drip, it is too wet and will run down your neck before the razor reaches it. If it stands up stiff and starts to look dry at the edges, it is too dry: it will feel chalky and the blade will drag.
The reason the texture is worth fussing over is that lather holds a film of water against the hair, keeping it soft, and puts a second film between the blade and your skin. That film is what lets you shave with light pressure. Lather that has collapsed gives you neither, which is why bad lather and a hasty shave tend to arrive together.
Step 1: Wet the brush the way its hair needs
Fill a mug or the sink with warm water and put the brush in it. How long it should stay there depends on the hair: boar, horse and the lower grades of badger need a real soak, a good badger needs less, and a synthetic brush only needs to be thoroughly wetted, because soaking it achieves nothing.
While the brush soaks, float the soap. If it is a puck in its own tub, pour a little warm water on the surface. If it is a loose puck, drop it in the water for a minute. Either way you are softening the outer skin of the soap so the bristles can pick it up, which is the step people skip when their brush just skates across a hard puck.
A synthetic brush is the simplest thing to learn on precisely because it removes the soaking variable and dries out between shaves without holding water or smell. If you do not own a brush yet, that is the trade to take first:

A boar brush is the other sensible starting point: stiffer bristles lift soap off a hard puck faster, it costs less, and it softens over a few weeks of use. The cost is the soak and the break-in period. The brush comparison sets out badger, boar and synthetic side by side if you want the full picture before choosing.
Step 2: Load longer than feels necessary
Tip the water out of the soap, give the brush two gentle shakes so it is damp rather than dripping, and swirl it on the soap with a little downward pressure. Sharpologist puts loading at somewhere between ten and thirty seconds depending on the soap. Judge it by the brush rather than the clock: you want a thick paste coating the bristles, not a light foam. If you can still see the shape of individual hairs through a thin film, keep loading.
For a soft soap or a cream in a jar, an alternative is to scoop a thumbnail of product out and press it into the center of the brush, or into the bowl. It uses slightly more product and it removes any doubt about whether you loaded enough, which is a fair trade while you are learning what the loaded brush should feel like.
A soap that comes in its own tub is the easiest thing to load from, because the tub is also the surface you swirl on and there is nothing to chase around the sink. A firm triple-milled puck rewards the longer load; a softer soap in a tub picks up faster and needs less water later. Either way, load in the container it came in:
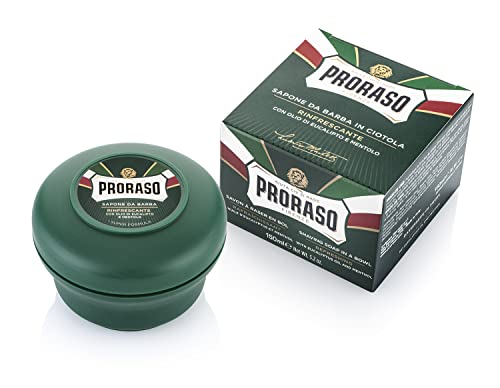
Two things to know about that tub before you buy it. It is a soft soap rather than a firm puck, so it loads quickly and a little goes further than the size suggests. And it is eucalyptus and menthol, so it feels cool and smells medicinal. If you dislike a cooling sensation or your skin reacts to fragrance, start with an unscented or lightly scented soap instead. The loading technique is the same either way.
Step 3: Add water in stages, not all at once
Take the loaded brush to your bowl, or straight to your face, and work it in moderately fast circles for about half a minute. Change direction now and then; it helps the lather come together rather than chasing itself around the rim.
Then stop and look. If the bristles are evenly coated in soft peaks, you are there. If the lather looks dry and you can see gaps or holes in the coating on the brush, dip just the tips in the water for a second and go back to circles for another half minute. Repeat that loop of dip, whip and look until the holes close up.
This staged loop is the whole technique. Pouring water in at the start is what produces a bowl of bubbles that will not thicken, because you have already diluted the soap past the point where it can hold structure. Water added to a loaded brush builds lather; water added to an unloaded brush builds foam.
Building lather directly on your face follows the same loop with one difference: you are judging by feel rather than by sight, and you get the extra scrub that lifting the bristles against the grain gives you. It is faster, and slightly harder to correct if you overshoot on water.
Step 4: Work it in, then shave with the grain
Once the lather is right, spend another thirty to sixty seconds working it into the beard with circular strokes rather than painting it on flat. You are lifting hair away from the skin and making sure the layer is even, which is what stops you from pressing harder on the patch where the lather ran thin.
Then shave with the grain. Lather does not make an against-the-grain pass safe; it makes a with-the-grain pass comfortable enough that you do not need to compensate with pressure.
Between passes, look at your face before you relather. If the first layer has dried or flaked, rewet the skin and add water to the brush before the second pass, because dry lather is worse than no lather: it drags. If you like the feel of warm lather, a scuttle or a cream warmer keeps the heat in the bowl, though the effect is comfort rather than closeness; what a cream warmer actually changes covers that before you spend on one.
If your lather keeps failing
Two tests settle most of this in a single shave, and both are free.
The water test. Build one lather with tap water and one with a cup of distilled or filtered water, changing nothing else. If the second lather is dramatically easier, your water is the problem and no amount of technique will fix the first one.
The load test. Load for ten seconds on one half of your face and for forty seconds on the other, and keep the water identical. The longer-loaded side should hold its structure noticeably later into the shave. If it does, you have been underloading and the fix costs nothing.
The list below is how you read those results, plus the two cases the tests cannot see. It runs roughly from the most common cause to the least:
- Thin and bubbly after thirty seconds. You loaded too little and then whipped in air. Go back to the soap for another ten seconds of loading and start again. More water will not fix this.
- Thick paste that will not spread. You are close. Add water three or four drops at a time and whip for ten seconds between additions. A splash undoes the batch.
- Great first pass, gone by the second. Underloaded brush. Loading longer is the fix; rewetting between passes is the patch while you get there.
- Lather collapses into gray water. Hard water. Calcium and magnesium bind to the soap and leave scum instead of lather, which is why soap makers suggest distilled water as a test. Try one shave with a cup of distilled or filtered water: if the lather suddenly works, the problem is your water rather than your technique or the soap.
- The soap itself looks glassy and nothing lifts off it. The surface has sealed over. Bloom it with hot water for a minute, or scrape the top layer with a thumbnail. A hard triple-milled puck in a cold bathroom also needs a few seconds of warmth before it will load.
If none of those apply and the soap is genuinely old, stored wet, or has lost its scent, the soap is the variable. That is a replacement question, not a technique question.
Bowl, face or palm
All three work. They differ in how easily you can judge the water, and that is the only reason to pick one.
A bowl gives you the most control: you can see the texture through the whole build, add water in small increments, and if you warm the bowl you get warm lather for the whole shave. What matters in a bowl is a wide enough mouth for the brush to move and reasonably straight sides; ridges or a textured interior help the lather form faster but are not essential. A large mug from the kitchen does the job, so treat a dedicated bowl as a convenience rather than a requirement:

The palm works and gives you direct feedback on slickness, but it is messy, you lose water, and it is awkward when you need both hands. It suits creams better than hard soaps.
Face lathering is the fastest route and builds and applies in one go. Start there if you shave in a hurry and do not want another object to wash.
Where lather sits in a shave that does not irritate
Good lather is one input, not the whole answer. The American Academy of Dermatology’s shaving guidance puts the same weight on the steps around it: wet the skin and hair first, apply a shaving cream or gel, shave in the direction the hair grows, rinse the razor after each stroke, change the blade every five to seven shaves, and store the razor somewhere it dries completely.
That order matters if your skin is already complaining. Changing your soap will not rescue a shave built on a dull blade and three passes against the grain. Preventing razor burn and irritation works through preparation, blade condition and pressure in the order that actually changes the result; come back to lather once those are in place.
A pre-shave oil is a separate decision from lather and does not replace it. What a pre-shave oil does and when to skip it covers the cases where the extra layer earns its place. If your lather is the problem, fix the lather first.
The short version
Soak the brush according to its hair, load until the bristles carry paste rather than foam, then add water in drips with thirty seconds of whipping between each addition, and stop when the lather turns glossy and holds soft peaks. Apply it with circular strokes, shave with the grain, and rewet before the second pass.
If you change one thing next time you shave, load longer. It is the cheapest correction available and it fixes more bad lather than any product will.


Leave a Reply