Nose hair is doing a job: it catches dust, pollen and other particles before they reach your lungs, and it helps the air you breathe hold its moisture. So you are not trying to empty the nostril of hair. You are shortening the strands that show at the opening, gently, without nicking the thin skin inside. Trimming does that in a few seconds once you know the sequence; plucking does not, and it carries a risk worth understanding.
This guide covers how to do it without pain: the usual reasons a trim stings, the two tools worth using, the step-by-step method, and when a sore nostril is a reason to stop and see a doctor rather than try again.
Why a nose-hair trim hurts
Pain during a trim almost always comes down to one of five things, and none of them is the hair being “too tough”.
- You are pulling the hair out instead of cutting it. Tweezers, wax and any tool that grips rather than slices pull the whole shaft from the follicle. That is the version that stings, and it is the one with a downside you will read about below.
- The blade is catching hair, not cutting it. A dull head, or a straight blade pressed flat against the lining, tugs at hairs instead of slicing them. A small rotary head avoids this because the hair enters the openings and is cut there.
- You are going too deep. The sensitive part is further in. Work only at the rim, where you can see what you are doing.
- You are cleaning too aggressively afterwards. Scrubbing or rinsing the inside of the nostril irritates the lining; a gentle blow is enough.
- You are over-trimming. Taking everything you can reach leaves the lining exposed and can make the next few days feel raw. Shorten the visible hairs and stop.
What to use
There are two sensible tools. Small scissors with rounded tips are the cheapest safe manual option; the rounded tip is what stops you poking the skin, but they are slower and it is easy to take off more than you meant to. A small rotary trimmer is faster and more forgiving, because the cutting edge sits inside a rounded head rather than against your skin.
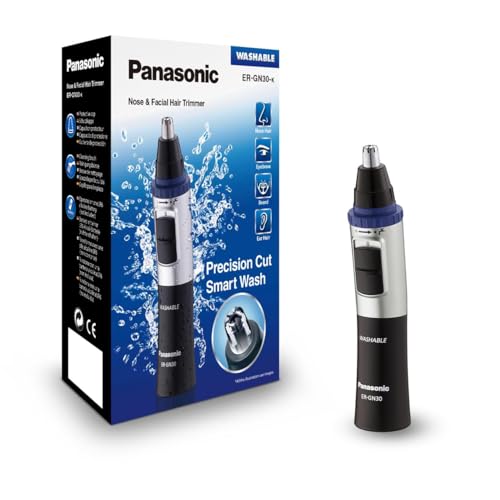
For a job this small, the tool that matters is one whose cutting edge never lies flat against the lining. The Panasonic ER-GN30-K is the inexpensive answer, and it is put together the way this task wants: a slim body you can hold at the angle a nostril needs, a dual-edge blade that takes hair entering from the top and the sides, and a head you can rinse clean after a wet or dry trim. It runs on a battery rather than a built-in cell. Its limit is depth, not power; no trimmer this size reaches far up the passage, and it is not meant to.
The Philips Norelco Nose Trimmer 3000 puts a guard between the blade and your skin, which is the feature to look for if you have nicked yourself before. It is sold for nose, ears and eyebrows, so one tool covers more than one job, and it takes a battery as well. The trade-off is a slightly bulkier head than a slim pen-style trimmer.

If you are weighing a third option with an LED and a water-rinsable stainless head, our buyer’s guide to nose and ear hair trimmers compares it against these two and explains what actually separates them.
How to trim nose hair, step by step
- Set up where you can see. Stand in front of a mirror in good light, and blow your nose first so loosened hairs and dried mucus are out of the way.
- Start with a clean, dry tool. A head clogged with old clippings pulls instead of cutting. Brush it out, or rinse it if the model allows, and let it dry.
- Work at the opening, not deep inside. Tip your head back slightly and keep the tool just inside the rim, where the hair is visible. Going further in gains nothing and is where most nicks happen.
- Trim in short passes. Move the trimmer gently against the growth with no pressure. With scissors, take small snips rather than one big cut. If a hair catches, stop, clear the tool and start again from the rim.
- Check, then stop early. Look in the mirror and shorten only the strands you can still see at the opening. Leave the finer hairs further back; they are the ones doing the filtering.
- Finish gently. Blow your nose a couple of times to clear loose clippings, then leave it. Do not rinse the inside of the nostril with water, and do not scrub it.
Cleaning the trimmer properly is the other half of the routine, and it takes about as long as the trim itself; our guide to cleaning and maintaining a nose hair trimmer covers the head, the batteries and how often to replace the cutter.
Why trim rather than pluck or wax
Trimming shortens the hair; plucking and waxing remove it from the root. That difference is the whole argument. Pulling out a nasal hair leaves an open follicle in a warm, damp, bacteria-friendly space, and the published guidance is consistent that this is not recommended: plucking and waxing are linked to ingrown hairs and to infection of the nasal lining.
There is a second reason to be careful with anything that breaks the skin at the entrance to the nose. That area sits inside what doctors call the “danger triangle of the face”, the stretch from the bridge of the nose to the corners of the mouth, where the veins drain towards a network behind the eyes. An infection there has a small but real chance of travelling further than you would expect. Keep a cut or an angry spot in that zone clean and watch it, rather than digging at it.
Hair-removal creams belong nowhere near your nose, whatever a label implies. They are strong enough to burn the mucous membranes inside it, and you would be inhaling the fumes while they sit there.
When to stop and see someone
A trim done this way should leave no lasting soreness. Stop trimming and get medical advice if a nostril keeps bleeding, if the soreness or redness is getting worse rather than settling within a few days, or if you develop a fever, chills or feel generally unwell. A facial infection that is spreading is not something to keep working on at home.
How often to trim
As often as it grows back into view, which for most people is every couple of weeks. It is a small recurring habit rather than a one-off fix, so the tool that wins is the one that is quick to rinse and ready when you need it. Trim a little more often and you can take less off each time, which is gentler than waiting and cutting deep.
The short version
Pick a tool that keeps the cutting edge off your skin, work only at the opening, and stop while some hair is still there. That is the whole method, and it is the opposite of the two things that cause the pain: pulling hairs out, and chasing every last one. Check the current configuration and availability before you buy, and treat a painful or infected nostril as a reason to see a doctor, not to try harder.


Leave a Reply