You already own the razor. What you do not have yet is an order of operations, and the two things that decide whether the shave feels comfortable are neither the razor nor the blade.
This is for the first month with a double-edge safety razor: you have used it a few times, or you are about to, and the results are inconsistent. If you have not chosen a razor yet, start with the guide to choosing a safety razor and come back to this. If your shave is close at eight in the morning and rough by lunchtime, the reason is in the close-shave guide. This is about the shave itself.
Two skills, and only two
Angle and pressure are the things beginners get wrong, and both are correctable within a few shaves. What is harder to find in most guides is how to find the angle on the razor in your hand, and how to know which way your own hair grows. Those are the two skills, and they are learnable in a single afternoon.
Everything else supports them. Lather, blade choice and plate settings change how forgiving a shave is, but a cheap razor held at a workable angle gives a decent shave, and an expensive one held too steeply still cuts you.
Map your grain before anything else
Grain is the direction the hair leaves the skin, and it is not the same across your face. Most people assume everything grows downward. On the neck it frequently does not: patterns shift halfway down, swirl, or grow upward toward the jaw. That assumption is why so many people break out under the jawline.
Let the stubble grow for two or three days, so it is long enough to read and short enough not to curl. Then rub a fingertip across each zone in several directions. The smooth direction is with the grain; the rough, scratchy direction is against it. A cotton ball does the same job, snagging against the grain and gliding with it.
Work zone by zone: each cheek, the jaw on each side, the chin, above and below the lip, the left and right of the neck, and the strip directly under the jaw. Write the arrows down. You will not remember them by the third shave, and the map is the difference between a first pass that removes hair and one that scrapes skin.
This is a one-time job. From then on, “with the grain” means a direction on your face instead of a guess.
Find the angle on the razor you own
Put the top cap flat against your cheek with the handle pointing straight out, roughly parallel to the floor. In that position the blade cannot reach the hair. Now tip the handle down, slowly, until you feel the blade just start to catch and cut the stubble. That is your angle. Hold it while the razor moves, in short strokes, instead of re-finding it on every pass. Hold the handle near its end in a light grip rather than choking up by the head: the further your fingers sit from the blade, the less able you are to press with them.
Guides disagree about the number, and both of the widely quoted versions are in circulation: about 30 degrees, and a 30 to 45 degree band for shavers refining technique. They are not measuring quite the same thing. Some describe the angle of the razor in your hand, others the angle between the blade and your skin, and a razor’s head geometry builds in an angle of its own before you hold it at all. That is why a number is a starting estimate and the cap-and-tip method is the instruction: it finds the angle built into the razor you are actually holding.
The two ways to get it wrong feel different. Too shallow and the edge skates over the stubble without reducing it, so you press to compensate, and the pressing is what burns. Too steep and the blade scrapes skin instead of slicing hair. The test is simple: the stubble is shorter, and the skin is not stinging.
Cap or guard, and why the same razor gives two answers
Once you can find the angle, you can bias it deliberately. Riding the cap, with the handle closer to upright, gives a shallower and milder cut, which suits a daily shave or the corner where the jaw meets the neck. Riding the guard, with the handle closer to the skin, cuts closer and raises the risk. Same razor, same blade, different result. That is why two experienced shavers can quote different angles and both be describing what works for them.
What your razor’s head is doing
A closed comb, the common beginner type, has a solid safety bar beneath the blade. The bar limits how far the edge can reach toward your skin, which is the reason these razors feel forgiving. An open comb replaces the bar with teeth, so longer growth passes through instead of being pushed aside by it. That puts more of the blade in contact with your skin, and it is not the easier place to start.
An adjustable adds a third variable: the gap between the blade and the bar can be changed without changing razors. The Rockwell 6C shows it most clearly. It is a three-piece closed-comb razor with three double-sided plates that give settings 1 to 6, paired 1/3, 2/4 and 5/6, and the number visible under the assembled head is the setting in use.
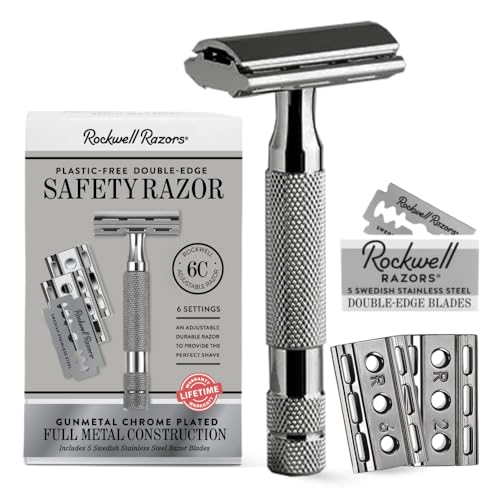
For learning, that range does real work. A lower plate narrows the gap, so an angle that wobbles does less damage while you practice, and you can move up once your strokes are steady. The plates are not a skill ladder and the higher number is not the better shave: someone with dense growth may prefer a high plate while another shaver is happiest at 2 or 3 for daily use. Changing one means unscrewing the head, so decide before you begin rather than mid-shave.
Do that over a flat surface, keep your fingers off the edges, and lift the blade out by its ends. Never wipe it dry with a cloth or a thumb: a blade that thin will cut whatever it is dragged across.
None of that replaces the angle. A mild plate held too steeply still scrapes, and no setting makes a shave irritation-free.
If your razor is a fixed two- or three-piece, none of this applies and none of it is a disadvantage. You have one gap to learn instead of six, and the grain map and the angle are still the whole job.
The first pass, in order
Shave after a shower, or with warm water, because hair that has taken up water is easier to cut. Then build a lather and give it a moment on the skin rather than starting on a half-formed one. Lather repays attention, and a skipped step is why it collapses halfway through. If yours keeps thinning out, read how to lather shaving soap before blaming the soap.
Follow your map, one short stroke at a time, and rinse the blade after each swipe instead of letting lather and hair build up on the edge. Do not return to the same patch for another attempt. If an area is not clear, that is what a second pass is for.
One pass with the grain is a complete shave while you are learning. It will not be the closest shave you have had, and that is the trade being made: the first month is about a shave you can repeat tomorrow without sore skin.
The second pass, and the one to postpone
If the first pass left visible stubble and the skin is calm, lather again and go across the grain, at right angles to the direction the hair grows. It cuts closer than the first pass with far less risk than going against the grain.
Against the grain is the closest pass and the one most likely to leave a bump, and on the throat and jawline it is often a bad bet. Leave it out while you are learning. If you try it later, keep it to areas where your hair grows in one clear direction and stop when the skin stings. What that pass does to the cut end of the hair is set out in the close-shave guide, which explains it in detail.
One rule covers both passes: when the lather has gone, so has the protection. Re-lather the area, or finish.
Neck and jawline
These are the two places that bleed, and they need different handling from a cheek. Pull the skin taut with your free hand, or turn your head to flatten the surface, then shave it in short strokes. Under the jaw, where the surface curves away from the blade, flattening matters as much as the angle.
Under the nose, pull the upper lip down and use shorter strokes still. On the neck, follow the arrows from your map, which may point upward on one side and downward on the other.
When you nick yourself mid-shave
Stop on that spot. Rinse with cold water, wet the tip of a styptic stick and press it against the nick for ten to fifteen seconds, then rinse again. A styptic is aluminum sulfate, and it works on a single small bleeder; applying it to razor burn, a rash or a patch of bumps stings and does not help.

Then move to a different area, or finish. A nick is usually the angle steepening for a moment or the hand pressing, so the useful response is to correct that rather than to keep working the same square inch of skin.
Hold the blade still while you learn
Blade choice changes how a shave feels, and picking one deserves better than a default; the guide to safety razor blades covers how the edges actually differ. Month one needs something narrower: one blade, used for every shave, so that when a shave improves you know it came from your hands. An inexpensive blade is the practical choice, because you will go through several while you learn. The point is consistency, not a claim that one blade suits everybody.

Replace it when it tugs rather than when the calendar says so. Published figures put a blade anywhere from three to seven shaves, and the spread is wide because hair and blades both vary. A blade that pulls is already costing you skin, and a sharper edge is the safer one to hold.
The four habits that cost the first month
- Pressing. The weight of the head is enough to cut and the hand only guides it. If the head is pressing your skin pale, you are pushing, and pushing is what produces most of the soreness.
- Changing three things at once. A new blade, a new plate and a new soap in the same week tell you nothing about which one helped.
- Going over the same patch until it is smooth. That is how a shave that was fine becomes a rash by evening. Take the second pass instead.
- Judging the razor by shave one. The first is the worst you will get from it: everything after it is practice, and practice is the point.
After the razor leaves your face
Rinse with cool water, pat the skin dry rather than rubbing it, and let the razor dry completely before it goes away. A razor left wet grows bacteria, and a nick is the last place you want that. The full routine, including what to do about soap scum and the blade you have just taken out, is in the guide to maintaining a safety razor.
If the skin is still stinging the next day, or bumps appear and stay, stop shaving that area for a few days. Soreness that outlasts a shave is the signal that the angle or the pressure is still wrong, and another product will not correct either. Give the skin a week of rest, then come back to one pass with the grain and a lower setting if you have one. If it keeps happening, that is a question for a doctor rather than for a shaving guide.
If you are still deciding whether to switch
The useful comparison is not which razor is better but how much of the work you want to do yourself. A cartridge head sets the angle for you; a safety razor hands that job to your wrist. If holding the angle yourself for a month sounds like a nuisance rather than a skill, the cartridge is the rational choice and this advice is not for you. The comparison with cartridges sets out the rest of the trade.
The short version
- Map your grain on two or three days of stubble, zone by zone, and write the directions down.
- Find the angle by laying the cap flat and tipping the handle until the blade catches. About 30 degrees is an estimate, not a measurement.
- Let the razor’s weight cut. Pressing is the mistake behind most soreness.
- One pass with the grain is a finished shave while you learn. Add across the grain once your skin is calm.
- Stretch the skin on the neck and jaw, and follow your map there rather than the direction you used on your cheek.
- Nick: cold water, styptic for ten to fifteen seconds, then move on.
- Replace the blade when it tugs, and dry the razor before you put it away.


Leave a Reply